How to Draw SD Characters: Face
So, you want to learn how to draw.
Well, in this tutorial, you’ll learn one of the styles used in manga or anime arts: Super Deformed (SD, in short) characters. In case you don’t know what SD character means, SD is a style of manga/ anime where actual sized characters is deformed in an extremely cute way.
Due to its simplicity, SD characters are relatively easy to draw. And not only it is easy to draw, it is also less time consuming, and a very rewarding experience too (Aww… how cute ^_^).
If you happen to be a beginner in drawing, SD characters will prove to be a very useful way to learn how to draw manga or anime characters.
Interested to learn more? Read on!
Pointers:
Good tips, tricks and techniques are in BLUE.
Common pitfalls, errors, and disasters in RED.
How should a SD character look like?
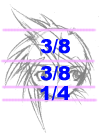
Before we learn how to draw the face of a SD character, here’s some simple guidelines: (Proportions shown in image)
- Face are more rounded
- Eyes are bigger than usual (About 3/8 to 1/2 of the face)
- Consists of simple lines
- The nose and mouth is simplified, and sometimes omitted
Compare this to any ordinary anime character and you’ll notice the difference.
NOTE: The proportion mentioned in the picture was not a standard in drawing SD characters. If you are not comfortable with it, adjust it.
A step-by-step guide
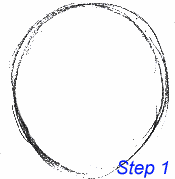
Firstly, we draw a circle as a basic shape of the face. (It was only meant to be a draft, so don’t worry if it is not perfect)
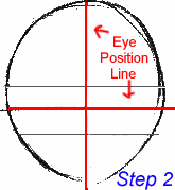
Next, draw a cross in the middle of the circle. This is the ‘eye position cross’, this step is crucial to prevent you from drawing crooked eyes.
Some artist will draw more lines or even circles to determine the size of the eyes. (e.g. thinner lines on the image that indicate the top and bottom of the eyes)
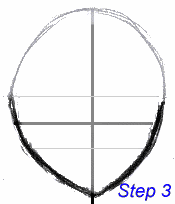
Define the chin line, try to draw it with the least strokes possible, so that it doesn’t look messy. Practice does help to achieve this.
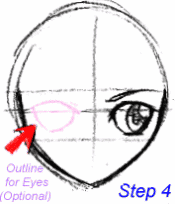
Now, draw the eyes and eyebrows to the the face (within the eye position range). Simple eyes will do the trick, and try to make them well balanced and symmetric to each other.
This might need a lot of practice, but it was well worth the effort in drawing good characters. If you find it hard to draw the eyes, draft the shape first.
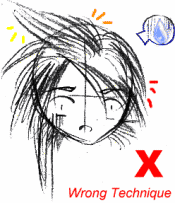
Finally, draw the hair of the character. Most beginners will have some trouble in drawing the hair, this is because they draw hair strand by strand. Avoid this at all cost! (It’s cumbersome, messy, and hard to correct, so why trouble yourself?)
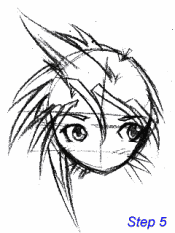
In anime drawing, hair is drawn in a bunch, i.e. the overall shape of hair.
No, it don’t have to be complex what-so-ever (it’s not even rocket science!), you’ll be surprised how geometric shapes can create good hair! It proves to be useful in any form of art as you can review the shape beforehand, and easy to add details later (e.g. how the hair will look like if I added some accessories, drawing some strands of hair to make your character attractive, etc.).
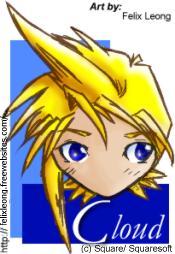
Final Result
There you have it! You should be able to draw a simple SD Cloud by now :). Add some details (mouth, nose, accessories…) to your character if you like to.
When you are satisfied with your draft, you can draw it in ink and color it. Believe me, they looked nice in inks and colors, and you might want to make it your desktop wallpaper.
Written by
Seh Hui Leong
Python programmer by trade, interested in a broad range of creative fields: illustrating, game design, writing, choreography and most recently building physical things. Described by a friend as a modern renaissance man.