How to Draw SD Characters: Body
In How to Draw SD Characters: Face, you have learned about how to draw a simple SD face of Cloud.
As you know, the head alone doesn’t make the character complete (unless he or she has been beheaded by a guillotine, but that’s another story).
So in this tutorial, you’ll learn about drawing the body of a SD character. No, don’t tell me you can’t do it! It wasn’t THAT hard! I’ll show you some proven techniques in drawing them!
Pointers:
Good tips, tricks and techniques are in BLUE.
Common pitfalls, errors, and disasters in RED.
How should a SD character look like
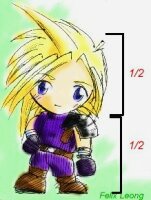
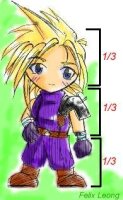
Basically, in art, we measure the height of a character not by inches or centimeters, but how many “heads” (i.e. the ratio between the head and the entire character’s height). A usual anime hero will have a ratio of 7-8, but in SD characters, there are two common conventions: A ratio of 2 or a ratio of 3. (See pic.)
As you can see, both of them are cute; but I’ll only concentrate on one in this tutorial: the “3-head-ratio” character. (The other one needs extra practice because you have to “squeeze” or “compress” the body without making the character odd-looking) But after you have master the techniques, just use any conventions as you please.
Here are some features of a SD character’s body:
- They look shorter.
- Joints and muscles are not emphasized (most of the time).
- Fingers are simplified, or omitted.
- Hands are usually represented by using a circle.
- You can hardly see the neck! (sometimes)
NOTE: Remember that you don’t have to follow these rules, add some or trash some to suit your needs. Sometimes, rules are meant to be broken :).
Step-by-step tutorial
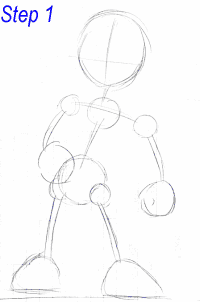
The first thing you must do is to draw a draft. Remember those stick figures you always draw in kindergarten?
Yeah, they look childish, but it is an excellent way to draft your character. So let’s modify that a little. Now, draw a big circle as the head, then draw circles to represent joints and the pelvis. Also, draft out the hands and feet. If your character bends their arms and legs, use curves instead of joint. Using curves will be more flexible than using joints, hence make your character more natural.
* NOTE: Take note that this step is crucial. This will help you in reviewing your character beforehand [and make your life easier, too]. Ignoring this step carries the “endless loop of drawing and erasing” risk. Well, better be safe than sorry, right?
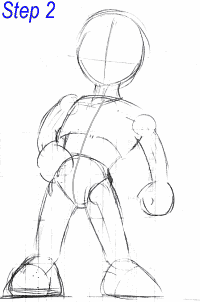
Now, you have the draft, so you can draft the outline of the body. Use basic geometric shapes sparingly, especially circles and ovals. Don’t forget to draw the eye position cross, and the center line of the body. This step will help you in checking whether the character is well balanced or not.
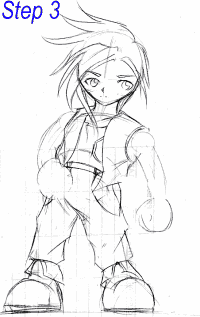
Draw out the face, then roughly draw out the basic costume without adding details to it. Again, this will help you in reviewing. You don’t want to end up being frustrated because you’ve wasted a lot time designing the costume, right?
At this point, some may argue that flesh should be drawn first. But since we have the draft, we can leave that afterwards (IMHO, of course).
One point to note that DON’T draw costumes that “stick” on the character’s body (i.e. joining the line between the body and the clothing). Even it is tight, the costume has some thickness, so they don’t “stick” on the body entirely.
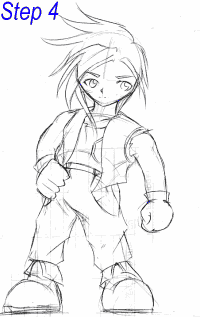
Then, draw out the arms, legs, hands, and legs (or any exposed flesh).
About the hands, don’t draw the fingers one by one: frankly speaking, they looked ugly if you didn’t draw it right. Instead, draw the hand and fingers as a whole, add lines for fingers afterwards.

For the last step, draw out the details of the costume.
Add some wrinkles to the costume (if it is made of cloth) if you want to, but not too much, they will make your picture messy. (Your judgment will be a good judge for this)
Drawing wrinkles needs a lot of practice to master it, but that is the key to draw realistic characters. Observation will help you a lot in drawing impressive wrinkles, so dig out your comic collection, or any photographs and try to practice with it.
Final Results
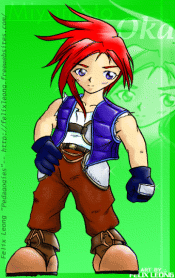
Well, there you have it! A complete SD character!(and if you succeed, rejoice! Reward yourself for that!) Now, remember: drawing isn’t an easy task, try to practice as much as you can to improve your skills (and have fun at the same time ^_^).
Now, why not you ink and color your picture then?
Written by
Seh Hui Leong
Python programmer by trade, interested in a broad range of creative fields: illustrating, game design, writing, choreography and most recently building physical things. Described by a friend as a modern renaissance man.