How to Draw Hair
Many had told me that the hair is the toughest part to draw, just because the final result doesn’t look like hair: especially when you’re handling tiny strands of hair to add detail.
Actually, hair is quite easy and fun to draw when you keep these things in mind:
- Point 1: The characteristics of hair.
- Point 2: The overall shape of hair, i.e. the hair style.
- Point 3: The force applied to hair
With these three things in mind, this will make your life simpler when you draw hair. I’ll explain that in the following section.
Pointers:
Good tips, tricks and techniques are in BLUE.
Common pitfalls, errors, and disasters in RED.
Different Types of Hair
This will be Point 1: The Characteristics of Hair. Learn about them is very important before you learn how to draw hair, because these details give you a guideline on visualizing the perfect hair style and where to start.
Basically, there are only six basic hairstyles you should keep in mind (excluding hair which is tied up, which will be covered in “Basic Introduction to Forces and Motion”). With these six basic types of hair, you can come up with different variations of hairstyle.
* Note: Actually, it can be categorize as 4 different characteristics: Long/Short, Straight/Curly, Pointed/Draped, Tidy/Untidy. But I feel that this 6 type approach is better in simplifying the task of designing hair.
Now, the six basic hairstyles are:
Short hair
This is the easiest style to design, draw and manage. Short hairstyle is usually unisex in nature, so designing short hair is quite a breeze.
But one disadvantage of short hair is that there are not many variations to short hair, making it quite dull. So when you draw short hair, try to add some hair accessories, have different front hair partitions for different characters, and add some hair movement to make it more lively.
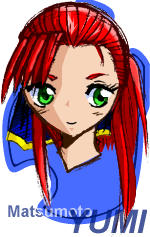
Long hair

Ahh… this is one style that would show the natural beauty of a woman (or even men!).
But to beginners, long hair is certainly a pain to draw. It’s long, so drawing it is quite a challenge, especially when it comes to hair movement. And to make it more natural needs a lot of practice to master the art.
When you draw long hair, detail is the key. Adding lines to show the flow of the hair will help to add the necessary detail to the art. This requires a lot practice and observation. Once you master this, the variations and beauty will certainly make your art look professional and your skills will shine.
Curly hair

Unlike its straight counterparts, this hairstyle’s flow is quite different from others. And this is another hairstyle that might challenge some artist.
But take a closer look; you’ll notice that curly hair usually curls from a certain point. So this makes drawing this style almost no different from straight hair, with an exception that you need to know the direction of the curl, especially the outer part of the hair. With this knowledge, drawing curly hair is quite simple: you just need to have your drafts right.
Pointy hair
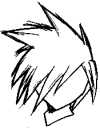
This kind of hair surely defies gravity, and usually makes the character more dynamic in looks. It doesn’t require much detail, making it much easier to draw.
This kind of hair looks kind of stiff compared to normal hair, so this make it ideal for those who are trying to learn how to draw hair. But this kind of style doesn’t suit some drawing styles (especially when your style is much incline to realistic art), so be extra careful. Oh! Just make sure the flow of hair is drawn towards the top.
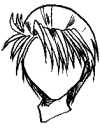
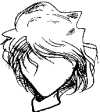
“Combed to the back” hair
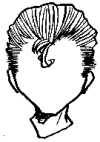
This kind of hairstyle is also simple to draw, you just need to observe the forehead hair line and make sure you draw out the strands of hair. But these kinds of hair just looked dull, so remember to add some extra hair sticking out from the front (like the one shown in the image), or use it to mix with tied-up hair.
Untidy hair
This is the hardest one to design, yet it is quite expressive in some ways. I can’t give guidelines on this (since it is untidy, and I can’t even draw this well), but just try not to give it a out of bed look. Don’t worry, this style is uncommon, so you better leave this style for that out of bed look. 😊
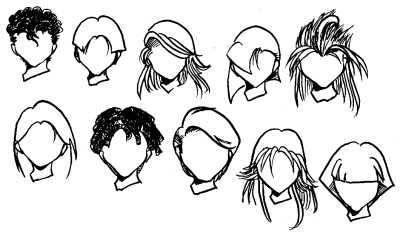
Now, knowing these characteristics, you should be able to start mix and matching these hairstyles to create new variations. Observations (especially from fashion magazines) and practice will help you a lot in identifying the characteristics of hair and improving your art skills at the same time. Here are some examples of different hairstyle variation:
Step-by-Step Drawing Guide
Point 2: The overall shape of the hair, i.e. the hair style might seem similar to Point 1, but there is a slight difference between them: Point 1 focus on design phase, while Point 2 is much more inclined to the implementation phase.
Before we draw our characters, we must have a draft beforehand. And for drawing hair, the draft will prove to be very useful. And drawing out the overall shape of the hair will help a lot in drafting, and we will see how important it is in the step-by-step guide below:
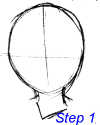
As usual, draw the draft of the face.
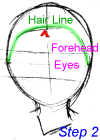
For this step, let me introduce you to another draft line — the “Hair Line”. This is the line that separate between the forehead and the hair. This is important because most people has a tendency to forget to leave space for the forehead, making the character looked odd (which happens often). So, remember this fact while you draw.
Do you notice the red triangle on the image? Well, that is also another important marker while drawing, it is called the “Hair Partition Marker”. This is the point where the hair partitions, it can be on the left, right, center, or doesn’t exist at all. This triangle acts as a reference for you when you drawing hair with partitions.
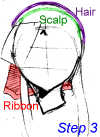
Now, draft the basic shape of the hair. Do take note that the hair doesn’t stick to the head (Pitfall No. 2), as shown in the image. Since hair sprouts out from your scalp and then bends to a certain direction (usually down), the hair does not “stick” completely to the head.
While you draft the hair, keep a smooth flow so that the hair looks natural (Always remind yourself to this fact). Even pointy hair have to maintain a smooth look so that the character doesn’t look like (s)he had a “bad hair day” :).
At the same time, I only draft simple lines for the hair in front (for review purposes). And I draw out the ribbon to remind me that her hair is tied up together. Since the ponytail is partially hidden from this viewpoint, it’s OK to omit that.
At this point, you can draw out the details for the hair. Notice that the fine and uniformed lines are drawn towards the back where the hair is tied. This is because there was a force (the ribbon) that “pulls” the hair to the back. (Refer to the following section)
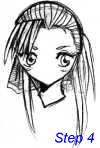
With the details drawn, the hair is now complete.
Basic Introduction to Forces and Motion
Everyone knows that hair is not totally solid, and outside forces is able to make hair move and sway. And because of this, hair is certainly a pain to draw when it comes to drawing lively, moving characters. (and that’s what makes it interesting!) And that makes Point 3: The force applied to hair very important.
But don’t panic! Once you identify these forces and you know how to apply it, drawing “moving” hair is very easy. The only thing you need to know is to keep the smooth flow. To do that, you need to know the forces and its effects to the flow!
* Note: If you feel that the topic that I’m going to cover is too advanced, just take this tutorial as a common sense lesson, or save this page for future reference.
Force #1: Gravity
Simple as that, this is the first flow you need to know. Hair has some weight, so hair will be “pulled down” by gravity.

But be careful though, there are some exceptions. Especially when you are dealing with pointy hair, or when your character is in somewhere where gravity doesn’t has much effect (space, underwater etc.). And another exception is that when the hair is fixed (with hair cream or natural reasons), and that force that makes the hair “stick” is much greater than gravity. [See image]
Force #2: Natural forces (Wind, water etc.)
Now, let’s add another force into the scene and this makes it TWO forces. Now, the rule is almost the same (hair moves towards the force of motion), but with some additional physics in there. You can see, when two forces was applied, a combined force will determine the motion (see the red arrow). And the combined forces will be more inclined to the greater force.
Sounds complicated? Look at the image to have a better understanding.
Force #3: Character motion
Now, one thing that why actions scenes are hard to draw is how to make your art natural. And one factor is to know the connection between motion and flows of air. [I use stick figures to avoid distractions caused by details]
As you can see, now we have three forces to consider: Gravity, natural, and motion forces. And one rule you must keep in mind is that The flow of air always the opposite to the flow of motion. Let’s see example 1, you can see that when the character runs forward, the flow of air moves towards the back.
But don’t confuse between the flow of air and wind! These two can be individual forces. (as in example 3) Do some observation yourself and you will get the point.
Force #4: Point of Force (POF)
This one is really important if you wanted to draw tied-up hair (braids, ponytails, etc.), especially when you deal with details (ie. strands of hair).
Point of Force (POF) is the point where force is applied, and because of this, hair will gather towards this point.
Let’s take the ponytail as an example. You can see that the hairband (in red) acts as a POF, and hair was “pulled” towards that point. And those that were not affected by the POF will remain at its orginal state (see the hair near the neck).
So when you draw hair that is tied up, make sure you identify the POF.
Written by
Seh Hui Leong
Python programmer by trade, interested in a broad range of creative fields: illustrating, game design, writing, choreography and most recently building physical things. Described by a friend as a modern renaissance man.